
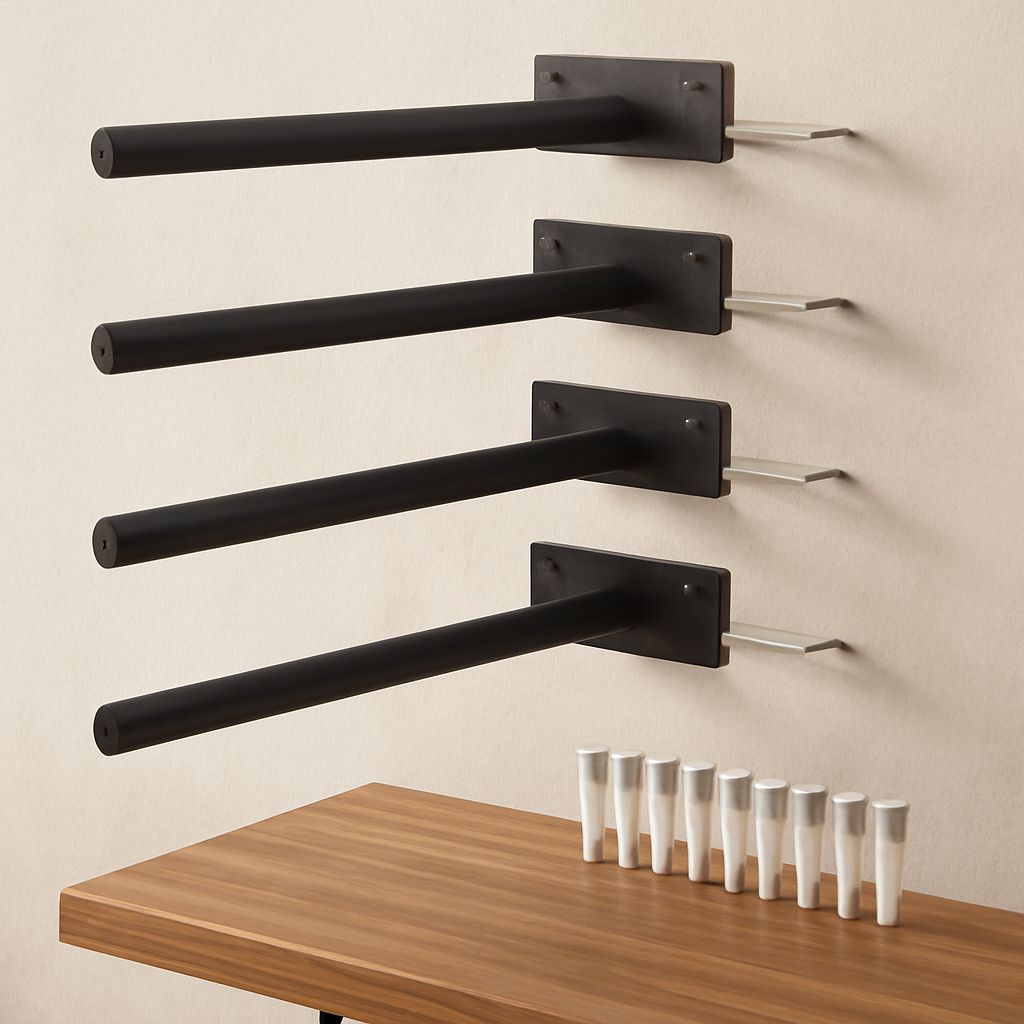
Hidden shelf brackets are selected mainly by the shelf’s construction and the wall behind it. Drilled-rod supports suit many existing solid shelves, while routed plates, cleats, hollow-box frames, and recessed systems are usually better for custom fabrication.
These hidden shelf supports conceal the load path after installation, but they do not all carry weight in the same way. Check shelf thickness, depth, internal structure, wall attachment, and locking provisions before choosing a format.
Types of Hidden Shelf Supports
Drilled-rod brackets use one or more steel rods projecting from a wall plate. Matching holes are drilled into the shelf’s back edge, allowing the shelf to slide over the rods. They are relatively easy to fit to an existing solid timber shelf, provided the shelf is thick and deep enough. The rods resist downward load, while the wall plate and shelf fit resist rotation.
These supports offer limited adjustment. Some have slotted wall plates or adjustable rods, but the shelf holes must still be accurately aligned. They work best when the shelf can be drilled without weakening it. A thin board, veneered panel, or shelf with hidden voids may not provide enough material around the holes.
Routed-plate brackets use a broad metal plate that sits inside a cavity cut into the shelf. The plate spreads load over a larger area than individual rods and can provide better resistance to twisting. However, the shelf usually needs a factory-quality routed cavity, making this format more suitable for a custom shelf.
Cleat systems use a wall-mounted cleat and a matching cleat or channel on the shelf. A French cleat is a common example. The shelf drops onto the wall piece, distributing load along the cleat rather than concentrating it at a few rods. Cleats are strong when properly fixed, but they need a rear recess or hollow space and provide little fine adjustment once installed.
Hollow-box brackets are metal frames or welded boxes that fit inside a hollow shelf. The shelf slides over the frame, hiding it completely. This is a good choice for a thick-looking shelf made from a box, torsion-box, or laminated panel. The shelf must include internal blocking where screws or fasteners will engage; a thin skin alone cannot reliably hold the bracket.
Recessed systems place the support plate, tube, or mounting structure inside a wall chase or a deep shelf recess. They can produce the cleanest finish, but they require the most preparation and accurate structural planning. Wall cutting, reinforcement, and custom shelf fabrication may be necessary.
Use the term invisible shelf brackets only when the required plate and fasteners are concealed in the intended installation. A front-facing plate or exposed screw may still be functional, but it is not invisible.
Shelf Fabrication for Blind Shelf Brackets
The required shelf thickness depends on the bracket design, rod diameter, hole depth, shelf depth, and expected load. Many drilled-rod products need a substantially thick solid shelf, often around 30–40 mm, but the manufacturer’s minimum is controlling. Do not assume an 18 or 20 mm furniture board can safely accept a deep rod hole.
For a drilled-rod system, mark the hole centers from a straight reference edge and drill parallel to the shelf faces. The holes must be deep enough for the rods to engage fully, but they must not break through the front or top surface. A drill guide is useful because even a small angle can prevent the shelf from sliding onto all rods at once.
A routed-plate system needs a cavity with the correct length, width, and depth. The cavity should leave enough material above and below the plate to prevent splitting or crushing. Keep the route square to the shelf and avoid cutting through edge bands or weak joints. If the shelf is already finished, routing can damage its surface and expose a repair line.
Cleats require a back recess or open channel deep enough for the wall cleat to sit behind the shelf’s rear edge. Leave clearance for the shelf to drop over the cleat. Hollow shelves need internal timber blocking, plywood ribs, or a designed box frame at every bracket location. Mark these reinforcement zones before closing the shelf.
Existing solid shelves are most compatible with drilled rods, assuming their thickness, depth, and condition meet the bracket specification. Custom shelves allow better use of routed plates, cleats, hollow-box frames, and recessed supports because the cavities and reinforcement can be built in accurately. If an existing shelf is hollow, thin, warped, or already edge-damaged, replacing it is usually safer than improvising a hidden cavity.
Shelf depth also affects leverage. A deeper shelf places more force in front of the wall attachment, especially when books or objects sit near the front edge. A shallow shelf may work with shorter supports, while a deep shelf may need longer brackets, closer spacing, or a stronger frame.
Wall Attachment for Invisible Shelf Brackets
Concealed hardware is only as strong as its connection to the wall. Locate studs before drilling and attach the wall plate, cleat, or frame with structural screws that penetrate the stud sufficiently. For masonry, use anchors rated for the wall material and the expected load. Brick, concrete block, and hollow block require different anchor types.
Do not rely on ordinary drywall plugs for a heavily loaded shelf. A hollow-wall anchor may support a light display shelf, but it cannot replace a stud or properly engineered backing when the shelf is deep or heavily used. If studs do not align with the desired shelf position, open the wall or install suitable structural backing rather than shifting the support into a weak point.
Put a support near each end of the shelf and add intermediate supports as length, depth, or load increases. Follow the bracket maker’s spacing and capacity limits. Long shelves often need more frequent supports because the shelf itself can sag between attachment points, even when every wall fixing remains secure.
Check the bracket’s projection against the shelf depth. The support should extend far enough into the shelf to develop its rated capacity, while leaving sufficient material at the front and top. A short engagement can make a shelf feel unstable and increase twisting at the wall.
Minor wall irregularity can usually be corrected at the attachment points. Use solid, non-compressible shims behind a wall plate or cleat, then retighten the fixings without bending the hardware. For a slightly bowed wall, shim each fixing location to create a straight plane. Do not use soft packing that can creep under load, and do not force a rigid shelf against a curved wall.
Alignment, Locking, and Testing
Mark a level reference line before installing the first support. A laser level helps when several brackets must align, while a straightedge confirms that their projections form one plane. Measure from a fixed corner rather than transferring marks from a wall that may not be square.
Adjustment varies by system. Slotted wall plates allow small horizontal or vertical corrections before tightening. Adjustable rods can correct projection or level, but they should be locked after alignment. Cleats usually need accurate installation and shimming instead of post-installation adjustment. Hollow-box frames may include leveling screws or slots hidden inside the shelf.
Use the intended locking method. Common options include grub screws through the shelf underside, set screws in the bracket, concealed bolts, retaining screws through a rear recess, or a mechanical cleat lock. Adhesive can reduce movement, but it should not substitute for a specified mechanical lock or structural fixing. Ensure every screw head remains accessible during fitting and fully concealed afterward.
Before loading the shelf, check four points:
- The shelf is fully seated on every rod, plate, cleat, or frame.
- Locking screws are tight without stripping the shelf material.
- The wall plate and fixings remain flat, with no pulled-out screw heads or crushed drywall.
- The shelf is level, does not rock, and has no widening gap at the wall.
Test with a modest, evenly distributed load first. Increase the weight gradually while watching for front-edge sag, twisting, creaking, movement at the wall, or separation around the shelf holes. Remove the load if any of these signs appear. A finished installation should remain steady under its intended distributed load, with heavier objects placed near the supports rather than concentrated at the front edge.